summoner: Tool for scaffolding completely configured production Haskell projects.
Tool for scaffolding completely configured production Haskell projects. See README.md for details.
[Skip to Readme]


Modules
[Index] [Quick Jump]
Downloads
- summoner-1.2.0.tar.gz [browse] (Cabal source package)
- Package description (as included in the package)
| Versions [RSS] | 1.0.0, 1.0.1, 1.0.2, 1.0.3, 1.0.4, 1.0.5, 1.0.6, 1.1.0, 1.1.0.1, 1.2.0, 1.3.0, 1.3.0.1, 1.4.0.0, 2.0.0.0, 2.0.1.0, 2.0.1.1 |
|---|---|
| Change log | CHANGELOG.md |
| Dependencies | aeson (>=1.2.4.0 && <1.5), ansi-terminal (>=0.8.0.4 && <0.9), base (>=4.10 && <4.13), base-noprelude (>=4.10 && <4.13), bytestring (>=0.10.8.2 && <0.11), directory (>=1.3.0.2 && <1.4), filepath (>=1.4.1.2 && <1.5), generic-deriving (>=1.12.2 && <1.13), gitrev (>=1.3.1 && <1.4), neat-interpolation (>=0.3.2.2 && <0.4), optparse-applicative (>=0.14.2.0 && <0.15), process (>=1.6.1.0 && <1.7), relude (>=0.4.0 && <0.5), summoner, text (>=1.2.3.0 && <1.3), time (>=1.8 && <1.9), tomland (>=0.5.0 && <0.6) [details] |
| License | MPL-2.0 |
| Copyright | 2018 Kowainik |
| Author | Kowainik |
| Maintainer | xrom.xkov@gmail.com |
| Category | CLI, CLI Tool, Development |
| Home page | https://github.com/kowainik/summoner |
| Bug tracker | https://github.com/kowainik/summoner/issues |
| Source repo | head: git clone git@github.com:kowainik/summoner.git |
| Uploaded | by shersh at 2018-11-30T13:43:41Z |
| Distributions | Arch:2.0.1.1 |
| Reverse Dependencies | 1 direct, 0 indirect [details] |
| Executables | summon |
| Downloads | 7964 total (34 in the last 30 days) |
| Rating | 2.5 (votes: 3) [estimated by Bayesian average] |
| Your Rating | |
| Status | Docs available [build log] Last success reported on 2018-11-30 [all 1 reports] |
Readme for summoner-1.2.0
[back to package description]🔮 Summoner


![]()
So many of our dreams at first seem impossible, then they seem improbable, and then, when we summon the will, they soon become inevitable.
Christopher Reeve
Summoner is a tool for scaffolding fully configured batteries-included production Haskell projects.
Do you want to create a library that is to be uploaded to Hackage/Stackage, that builds with both Cabal and Stack and supports the latest three major GHC versions? Or you are building a production application which uses a custom prelude and has CI with Travis Linux and AppVeyors Windows checks? Summoner can help you do all that with minimal effort from you - it can even upload the project to GitHub if you wish!
By the way, Summoner operates as either CLI or TUI application, so you can choose what you're more comfortable with and install only the required one.
Structure
Demo ↑
TUI demo ↑

CLI demo ↑

Scaffolded project structure ↑
This is an example of the project hierarchy you can get if you're running Summoner with all options enabled:
project-name/
├── app/
│   └── Main.hs
├── benchmark/
│   └── Main.hs
├── src/
│   ├── ProjectName.hs
│   └── Prelude.hs
├── test/
│   └── Spec.hs
├── CHANGELOG.md
├── CONTRIBUTING.md
├── LICENSE
├── project-name.cabal
├── README.md
├── Setup.hs
├── stack.yaml
├── appveyor.yml
├── .git
├── .gitignore
├── .stylish-haskell.yaml
└── .travis.yml
You can also see complete examples in the following folder:
Directory smallProject contains an example of the straightforward package, and fullProject shows a generated project with more advanced structure and more features.
Features ↑
Summoner is a tool that combines predefined configurations, command-line arguments and a chosen interface.
To fully understand the power in your hands with the help of Summoner, please check out this section.
Below you can see highlighted features in different categories.
Project ↑
-
Support for Cabal and Stack build tools.
-
Ability to pick stanzas (library, executable, test-suite, benchmark).
-
Option to include an alternative prelude, if desired. The project would then use
base-nopreludetechnique, and thePreludemodule would be added to the library target. -
Whole Hackage-upload checklist support.
-
Support for multiple GHC versions, with thoughtful reflection on project meta, base versions (e.g.
base >= 4.9 && < 4.12), etc. -
Different license support: MIT, BSD2, BSD3, GPL-2, GPL-3, LGPL-2.1, LGPL-3, AGPL-3, Apache-2.0, MPL-2.0, None (All Rights Reserved license without file).
-
Creation of the
CHANGELOG.mdfile with PVP versioning policy. -
Ability to include your
.stylish-haskell.yamlfile. -
Usage of the
ghc-optionsfield with sensible defaults.If warnings are not explicitly stated in the configuration file, then the following list of GHC flags is added to all stanzas:
-Wall
-Wincomplete-uni-patterns
-Wincomplete-record-updates
-Wcompat
-Widentities
-Wredundant-constraints      (ghc >= 8.0)
-fhide-source-paths          (ghc >= 8.2.2)
-Wmissing-export-lists       (ghc >= 8.4.1)
-Wpartial-fields             (ghc >= 8.4.1)
Besides, the following GHC options are added to the executable, tests and benchmark stanzas:
-threaded
-rtsopts
-with-rtsopts=-N
GitHub ↑
- Initialisation of the git repository inside the project folder.
- Initial commit creation.
- Uploading the repository to GitHub.
- Exhaustive
.gitignorefile. - Formation of the
READMEfile with Hackage, Stackage and CI badges. - Linking to the GitHub repository in the
.cabalfile. - Ability to include your
CONTRIBUTING.mdfile.
CI ↑
- Generation of the
.travis.ymlfile that runs build and tests on CI under Linux. - Configuration matrix on CI to build with multiple GHC versions and various build tools.
-Werroris enabled on CI not to miss any warnings.- Run HLint checks on CI.
- Generation of the
appveyor.yamlfile which runs build and tests on CI under Windows.
Others ↑
- Ability to create a project in offline mode.
Get started ↑
Prerequisites ↑
To start using Summoner make sure that you have the following tools installed on your machine:
git– to initialize the GitHub repo.hub– to upload the project to GitHub.curl– to download licenses.
Installation ↑
Summon contains two executables:
summon: scaffold projects using interactive CLI mode.summon-tui: scaffold projects using TUI.
Below you can find the description of how to install each of them so you can choose the one you want.
Summon-TUI ↑
NOTE:
summon-tuiis not supported on Windows. See this issue.
TUI: download binary ↑
You can download binary directly from GitHub releases.
After downloading binary, make it executable and copy it under convenient location, for example:
chmod +x summon-cli-linux
mv summon-cli-linux ~/.local/bin/summon
TUI: from source ↑
Fetch the repo using cabal:
cabal get -s summoner
or clone the directory from GitHub:
git clone https://github.com/kowainik/summoner.git
Step into the directory:
cd summoner
Build and install using cabal:
cabal new-install summoner-tui:exe:summon-tui
Build and install using stack:
stack install summoner-tui:exe:summon-tui
Summon-CLI ↑
CLI: download binary ↑
You can download binary directly from GitHub releases.
After downloading binary, make it executable and copy it under convenient location, for example:
chmod +x summon-cli-linux
mv summon-cli-linux ~/.local/bin/summon
CLI: from Hackage/Stackage ↑
Using cabal:
cabal new-update
cabal new-install summoner
Using stack:
stack install summoner
CLI: from source ↑
Fetch the repo using cabal:
cabal get -s summoner
or clone the directory from GitHub:
git clone https://github.com/kowainik/summoner.git
Step into the directory:
cd summoner
Build and install using cabal:
cabal new-install summoner-cli:exe:summon
Build and install using stack:
stack install summoner:exe:summon
Setup ↑
You can turn on bash auto-completion by running the following command:
source <(summon --bash-completion-script `which summon`)
Usage ↑
To start summoning projects nothing additional is required. However, to tweak your settings further, you can use additional configuration settings.
There are several options you can use to set particular configurations for new projects (in increasing order of priority):
- Default configuration file (
~/.summoner.toml). - Explicitly specified configuration file by
--file FILENAMEoption (used instead of the default one if specified). - Options that are stated by CLI arguments.
- User input. It could be
- TUI – User data specified in the window of
summon-tui. - CLI – Interactively inputted answers during execution of the
summoncommand (for the options that were not specified on previous steps).
- TUI – User data specified in the window of
To cut a long story short, the configuration uses Partial Options Monoid Pattern.
File configuration ↑
Here is the list of the options that can be configured to suit your needs. If options are not specified, they are asked interactively (or some sensible defaults are used).
| Field | Type | Description |
|---|---|---|
cabal |
Bool | Add Cabal support? |
stack |
Bool | Add Stack support? |
owner |
Text | GitHub login. |
fullName |
Text | Full name. |
email |
Text | E-mail address. |
license |
License | One of: MIT, BSD2, BSD3, GPL-2, GPL-3, LGPL-2.1, LGPL-3, AGPL-3, Apache-2.0, MPL-2.0, None. |
ghcVersions |
[GHC] | summoner uses default GHC-8.4.4. However, additionally you can specify other versions. For each version x.y.z the stack-x.y.z.yaml will be created. |
github |
Bool | Turn on GitHub integration by default? |
private |
Bool | Create private repository by default? (Ignored if github = false) |
travis |
Bool | Turn on Travis integration by default? (Ignored if github = false) |
appveyor |
Bool | Turn on AppVeyor integration by default? (Ignored if github = false) |
lib |
Bool | Create src folder with simple ProjectName.hs file and library target? |
exe |
Bool | Create app folder with simple Main.hs file and executable target? |
test |
Bool | Create test folder with simple Spec.hs file and test target? |
bench |
Bool | Create benchmark folder with Main.hs file with gauge library usage example? |
extensions |
[Text] | List of the default extensions to add into default-extensions section in the .cabal. |
warnings |
[Text] | List of the default checks and warnings to add into ghc-options section in the .cabal. |
stylish.* |
Text | stylish.file to provide the absolute file path OR stylish.url to download the .stylish-haskell.yaml file to use in the project. |
contributing.* |
Text | contributing.file to provide the absolute file path OR contributing.url download OR contribuint.link to link the CONTRIBUTING.md file to use in the project. |
[prelude] |
||
package |
Text | The package name of the custom prelude you'd like to use in the project (doesn't work without module field). |
module |
Text | The module name of the custom prelude you'd like to use in the project (doesn't work without package field). |
See the example of the configuration for projects of the Kowainik organization.
Command line arguments ↑
Available commands:
Usage:
  summon COMMAND
      Set up your own Haskell project

Available commands:
  new                      Create a new Haskell project
  show                     Show available licenses or ghc versions

Available global options:
  -h, --help               Show this help text
  -v, --version            Show summoner's version
summon new command: ↑
Usage:
  summon new PROJECT_NAME [--ignore-config] [--no-upload] [--offline]
             [-f|--file FILENAME]
             [--cabal]
             [--stack]
             [--prelude-package PACKAGE_NAME]
             [--prelude-module MODULE_NAME]
             [with    [OPTIONS]]
             [without [OPTIONS]]

Available options:
  -h, --help               Show this help text
  --ignore-config          Ignore configuration file
  --no-upload              Do not upload to GitHub. Special case of the '--offline' flag.
  --offline                Offline mode: create project with 'All Rights Reserved' license
                           and without uploading to GitHub.
  --cabal                  Cabal support for the project
  --stack                  Stack support for the project
  -f, --file FILENAME      Path to the toml file with configurations. If not
                           specified '~/.summoner.toml' will be used if present
  --prelude-package PACKAGE_NAME
                           Name for the package of the custom prelude to use in
                           the project
  --prelude-module MODULE_NAME
                           Name for the module of the custom prelude to use in
                           the project

Available commands:
  with                     Specify options to enable
  without                  Specify options to disable

Available command options:
  -h, --help               Show this help text
  -g, --github             Github integration
  -p, --private            Create private GitHub repository
  -c, --travis             Travis CI integration
  -w, --app-veyor          AppVeyor CI integration
  -l, --library            Library target
  -e, --exec               Executable target
  -t, --test               Tests
  -b, --benchmark          Benchmarks
summon show command: ↑
Usage:
  summon show COMMAND
      Show supported licenses or ghc versions

Available commands:
  ghc                      Show available ghc versions
  license                  Show available licenses
  license [LICENSE_NAME]   Show specific license text

Available options:
  -h, --help               Show this help text
For example, the following command preconfigures the project settings with the custom prelude relude, included library, executable, test stanzas (but without benchmarks), creates a private repository on GitHub with the Travis CI and AppVeyor CI integrated.
summon new my-project with -letgcpw without -b --prelude-package relude --prelude-module Relude
TUI ↑
TUI new command ↑
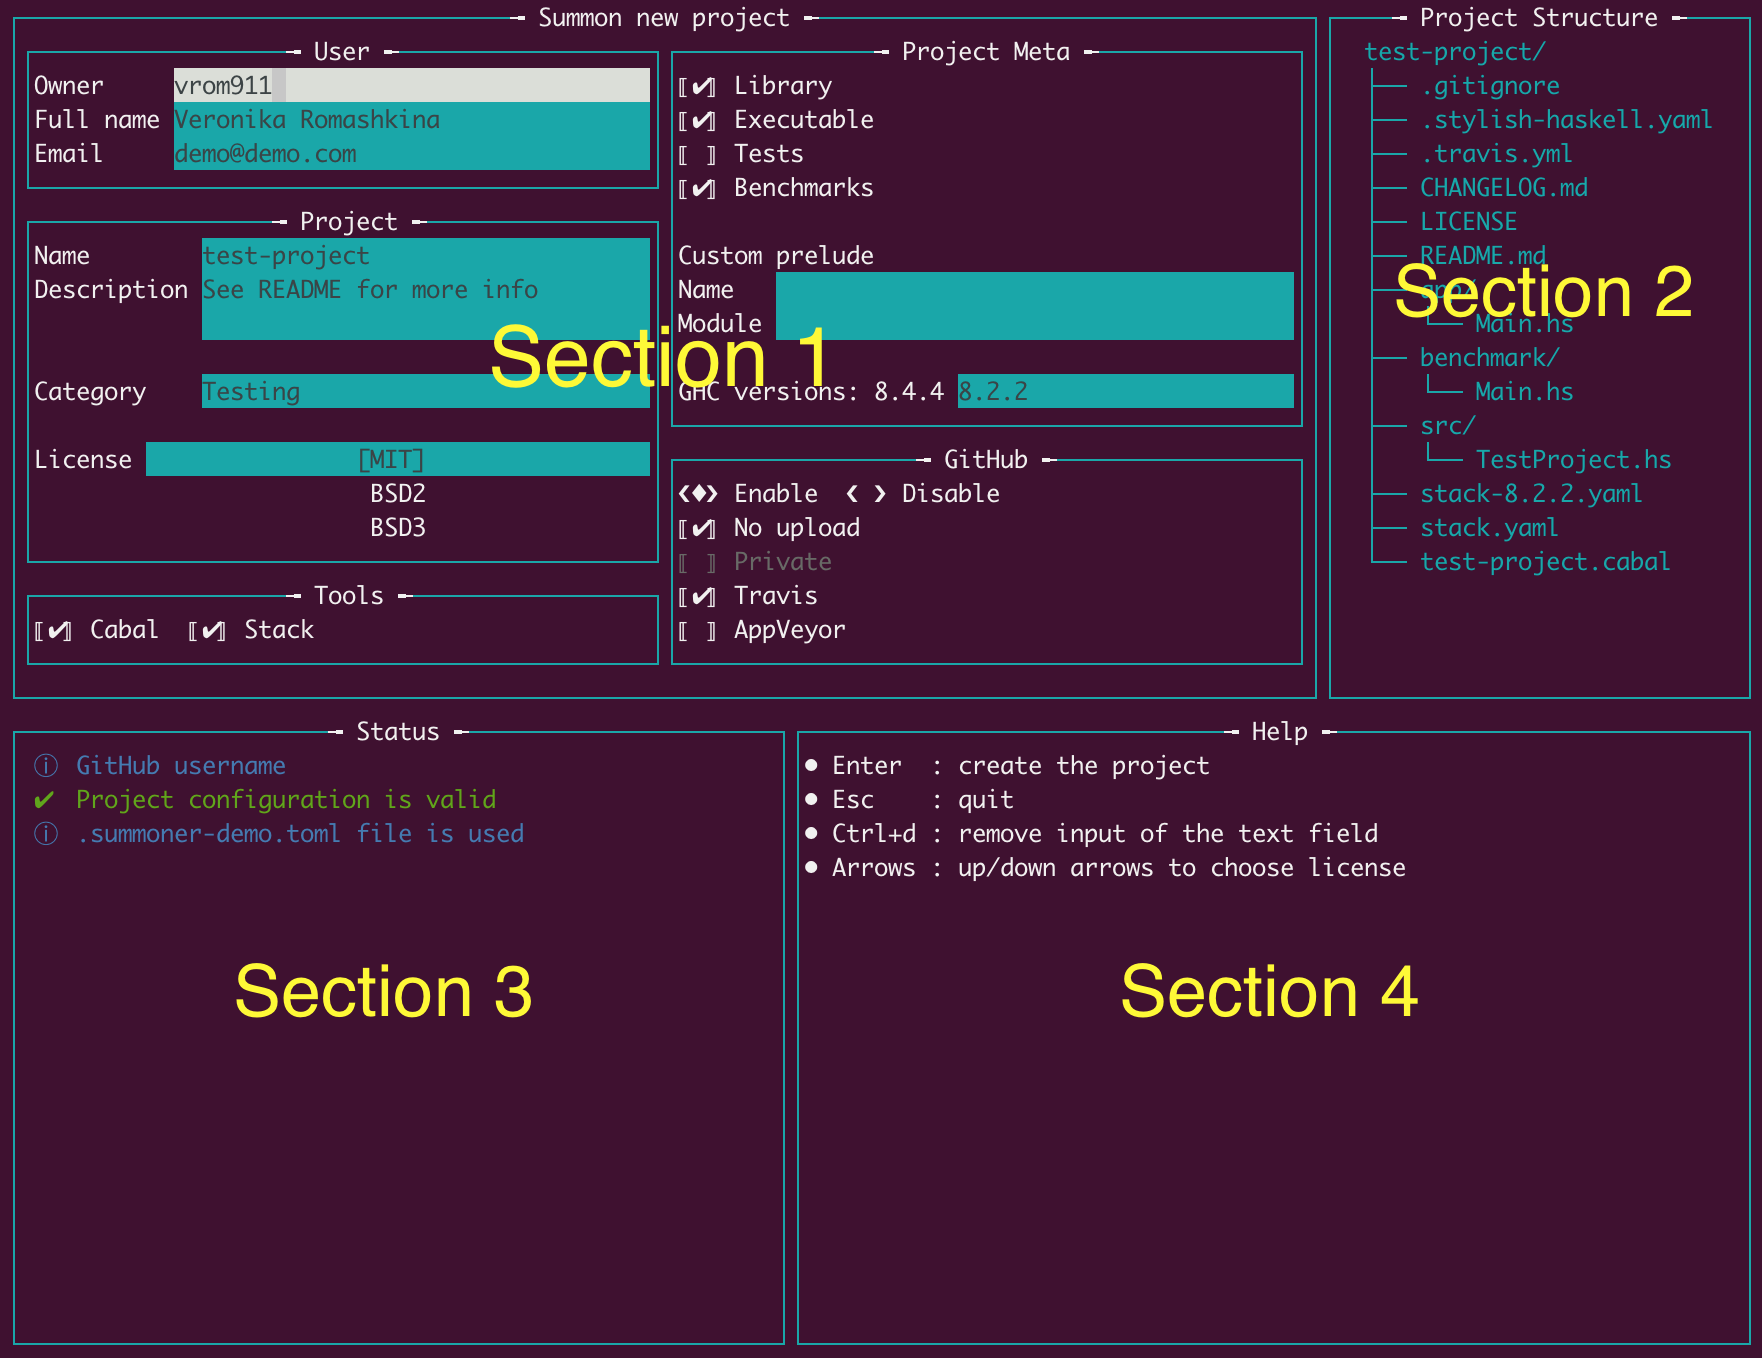
Section 1 – The main section where user inputs data or changes the configurations.
Section 2 – The structure of the project that is going to be created with the current configurations. This tree changes on-the-fly.
Section 3 – Hints, project status, or current errors in the configurations.
Section 4 – Useful hotkeys.
The TUI window opens with the pre-filled information received from a config file and command-line arguments. However, it's possible to change any field as per your needs.
In the screenshot you can see that you'll be given a few text fields to fill in or some checkboxes that represent boolean values of the configurations. To help you fill in the correct input, there are some ⓘ info messages in the Status section, which give additional details about the current field.
To help you navigate between the form fields here are the available hotkeys:
| Key | Action |
|---|---|
| Esc | Abort summoner |
| Enter | If input is valid go to the Confirm window |
| Tab | Change the focus to the next active field |
| Shift + Tab | Change the focus to the previous active field |
| Space | Enable/disable current checkbox or radio button |
| Ctrl + d | Delete the input of the current text field |
| Ctrl + u | Delete the input of the current text field from the cursor position to the beginning |
| Ctrl + k | Delete the input of the current text field from the cursor position to the end |
| Ctrl + a | Move the cursor to the beginning of the current input field |
| Ctrl + e | Move the cursor to the end of the current input field |
| Up/Down | Scroll license list when focused |
Note that the form should be valid in order to be able to go to the Confirm window. If there are some errors in the input, you could see details about these errors in the Status section of the form.
TUI show command ↑
These commands display the list of supported GHC versions or Licenses. Also, when the license name is specified the window with the scrollable content of the License text is shown.
CLI ↑
CLI new command ↑
In CLI mode of operation Summoner asks about every project setting. Most of the questions contain a default value, so you can press Enter to choose the default value. If some option is specified via a configuration file or CLI arguments, then the question is skipped and the predefined value is used.
CLI show command ↑
These commands display the list of supported GHC versions, or Licenses. Also, when the license name is specified, the content of the License is outputted to the terminal.
For Developers ↑
If you'd like to take part in the development processes, here are a few things to keep in mind:
- Summoner is a multi-package project which has two packages inside:
summoner-cliandsummoner-tui. We are supporting the same functionality in both of them, so, if it's possible, you should add/change the code in both of the packages. - Summoner uses the custom prelude
relude. - We are using the Kowainik style guide.
- To sum up, here is the Contributing guide we use across the repositories.
- This project is contributor-friendly, so be kind to other people working on the project.
Build ↑
To build the project you can use the following commands:
cabal new-build all
for Cabal and
stack build
for Stack.
Test ↑
Summoner uses the golden tests technique for assuring the correctness of the generated files. For this purpose, we have the golden folder with two sample projects to test against.
To actually run tests you need to run:
cabal new-test all
or
stack test
Run ↑
Building Summoner with the recommended method creates two executables: summon and summon-tui. To run the compiled executable you can use the following commands:
cabal new-exec summon -- SOME_COMMAND
cabal new-exec summon-tui -- SOME_COMMAND
or
stack exec summon -- SOME_COMMAND
stack exec summon-tui -- SOME_COMMAND
Changelog ↑
Each package has its own changelog:
Acknowledgments ↑
This project was inspired by Aelve/new-hs, which is the tool with the same goal but it's only for creating cabal projects.
Icons made by Nikita Golubev from Flaticon is licensed by CC 3.0 BY.